Want to Build Web Apps with Firebase and Streamlit? Here's How:
- Name
- Olaf Källström
Published on
Have you ever wondered about the magic behind serverless web applications? Or perhaps you've heard about Firebase and Streamlit and are curious about how these tools can revolutionize your web development process? Well, you're in the right place!
In this article, we're going to dive into the world of Firebase and Streamlit, two popular tools in the realm of web development. We'll explore their features, understand their workings, and most importantly, learn how to bring them together to create our very own serverless web applications in Python. So, buckle up and get ready for an exciting ride into the future of web development!
Part 1. Introduction to Firebase and Streamlit
What is Firebase?
Firebase is a comprehensive suite of cloud-based tools designed to help developers build, improve, and grow their applications. It provides a range of services, including a real-time database, authentication, hosting, and much more. Firebase's real-time database is a NoSQL cloud database that allows you to store and sync data between your users in real-time, making it perfect for rapid development and real-time applications.
What is Streamlit?
Streamlit, on the other hand, is an open-source Python library that makes it easy to create and share beautiful, custom web apps for machine learning and data science. In just a few lines of code, you can build interactive web applications with complex user interactions. Streamlit's simplicity and flexibility have made it a favorite among data scientists and machine learning engineers.
The Power of Firebase Streamlit Integration
When you combine Firebase's robust back-end services with Streamlit's user-friendly front-end capabilities, you get a powerful tool for building serverless web applications. This integration allows you to focus on writing your Python code, while Firebase takes care of the rest. You can store and retrieve data in real-time, authenticate users, and even deploy your app—all without needing to manage any servers!
Part 2. Getting Started with Firebase and Streamlit
Setting Up Firebase and Streamlit
Before you can start building your app, you'll need to set up Firebase and Streamlit. Firebase offers a web-based console where you can create and manage your projects. Once you've created a project, you can add Firebase to your app by including the necessary scripts and initializing Firebase.
Streamlit, meanwhile, can be installed via pip:
pip install streamlitOnce installed, you can create a new Streamlit app by writing a Python script and running it with the Streamlit command-line tool.
Firebase Streamlit Python: A Powerful Combination
Python is a versatile language known for its readability and ease of use, making it a great choice for web development. When used with Firebase and Streamlit, Python allows you to quickly build and deploy web apps with minimal code.
For example, you can use Python to interact with Firebase's real-time database:
import firebase_admin
from firebase_admin import credentials, db

# Initialize Firebase
cred = credentials.Certificate('path/to/serviceAccountKey.json')
firebase_admin.initialize_app(cred, {
    'databaseURL': 'https://your-database-url.firebaseio.com'
})

# Get a reference to the database
ref = db.reference('/')

# Read data
print(ref.get())
Firebase Streamlit Authentication: Securing Your App
Firebase provides a comprehensive authentication system that supports email and password authentication, as well as OAuth2 for Google, Facebook, Twitter, and GitHub. Firebase Authentication integrates directly with Firebase's real-time database, allowing you to authenticate users and secure your data with just a few lines of code.
In Streamlit, you can create a simple login form using text input fields and a button:
import streamlit as st

email = st.text_input('Email')
password = st.text_input('Password', type='password')

if st.button('Log in'):
    # Authenticate with Firebase here
By integrating Firebase Authentication with your Streamlit app, you can ensure that only authenticated users can access your app.
Part 3. Building Your First App with Firebase and Streamlit
Let's Get Started by Building a No Code Data Visualization Streamlit with PyGWalker (opens in a new tab).
Here's the online demo (opens in a new tab) that you can check out.
Before getting started with running PyGWalker in Streamlit, let's make sure your computer is set up with a Python environment (version 3.6 or higher). Once that's done, follow these simple steps:
Installing Dependencies
To get started, open your command prompt or terminal and run the following commands to install the necessary dependencies:
pip install pandas
pip install pygwalker
pip install streamlit
Embedding Pygwalker in a Streamlit Application
Now that we have all the dependencies in place, let's create a Streamlit application that incorporates Pygwalker. Create a new Python script called pygwalker_demo.py and copy the following code into it:
import pygwalker as pyg
import pandas as pd
import streamlit.components.v1 as components
import streamlit as st

# Adjust the width of the Streamlit page
st.set_page_config(
    page_title="Use Pygwalker In Streamlit",
    layout="wide"
)

# Add Title
st.title("Use Pygwalker In Streamlit")

# Import your data
df = pd.read_csv("https://kanaries-app.s3.ap-northeast-1.amazonaws.com/public-datasets/bike_sharing_dc.csv")

# Generate the HTML using Pygwalker
pyg_html = pyg.walk(df, return_html=True)

# Embed the HTML into the Streamlit app
components.html(pyg_html, height=1000, scrolling=True)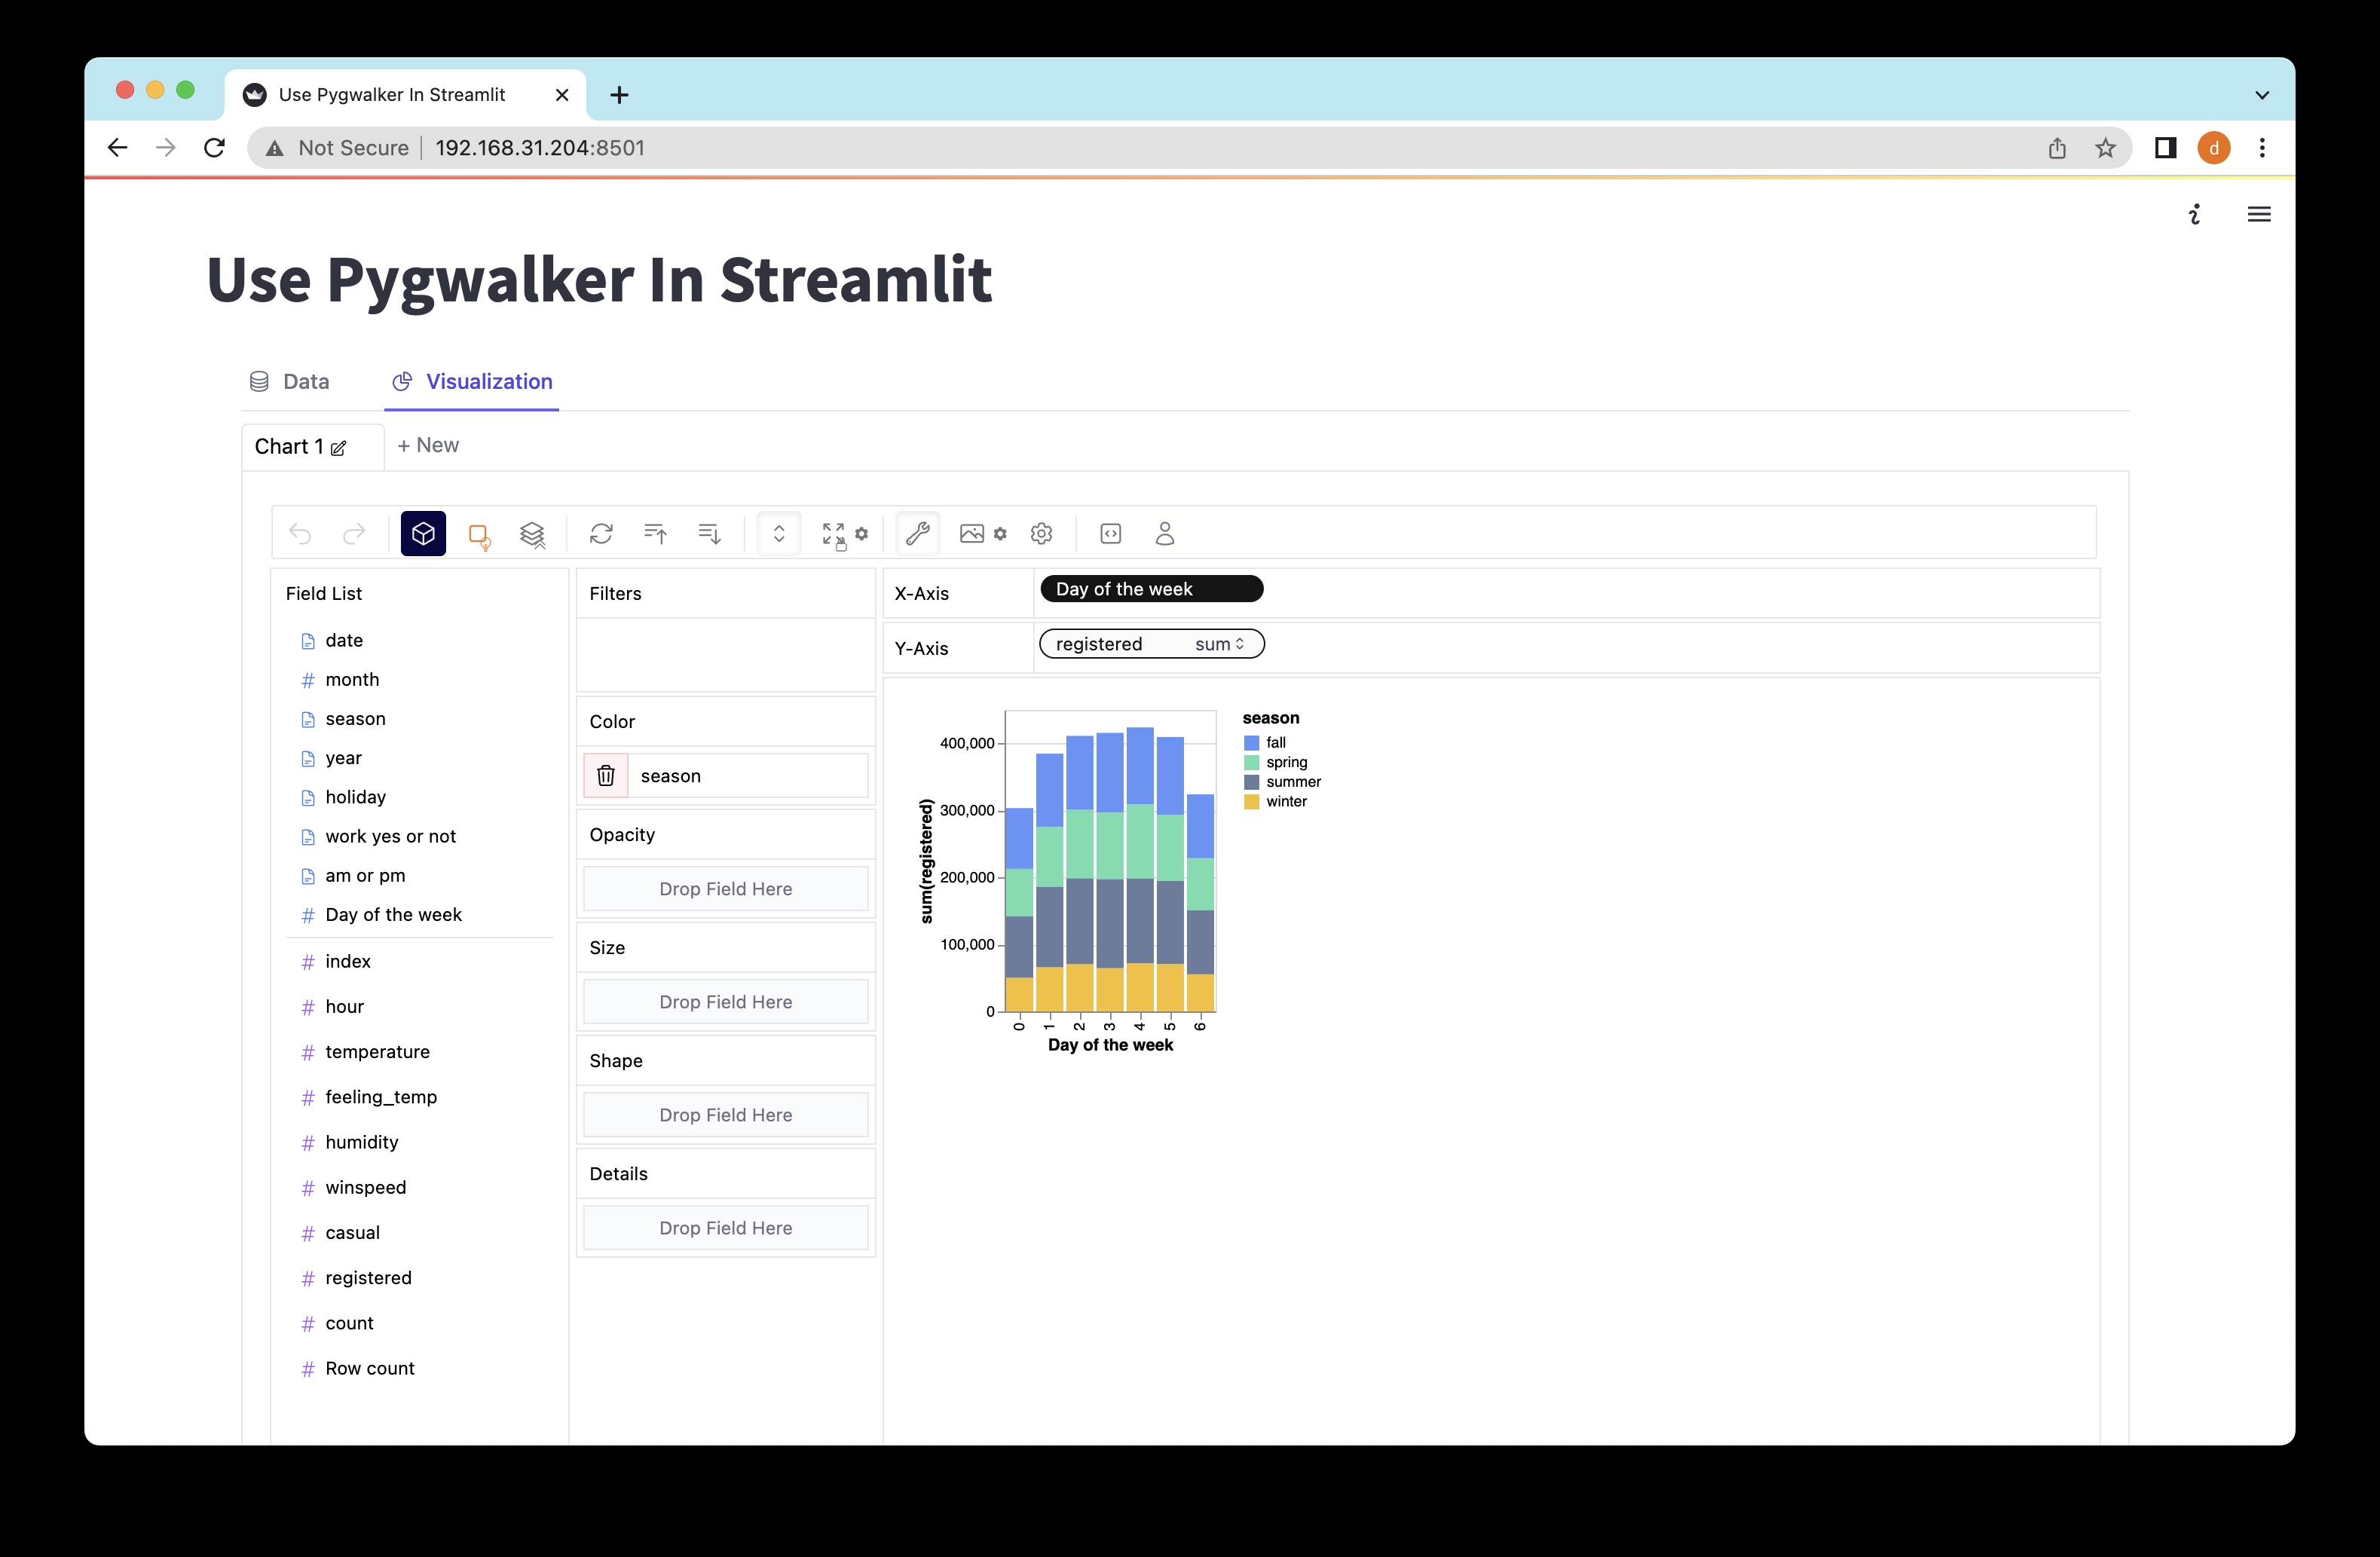
Exploring Data with Pygwalker in Streamlit
To launch the Streamlit application and start exploring your data, run the following command in your command prompt or terminal:
streamlit run pygwalker_demo.pyYou should see some information displayed:
  You can now view your Streamlit app in your browser.

  Local URL: http://localhost:8501
  Network URL: http://xxx.xxx.xxx.xxx:8501
Open the provided URL (http://localhost:8501) in your web browser, and voila! You can now interact with your data and visualize it using Pygwalker's intuitive drag-and-drop actions.
Saving Pygwalker Chart State
If you want to save the state of a Pygwalker chart, it's as easy as following these steps:
- Click the export button on the chart.
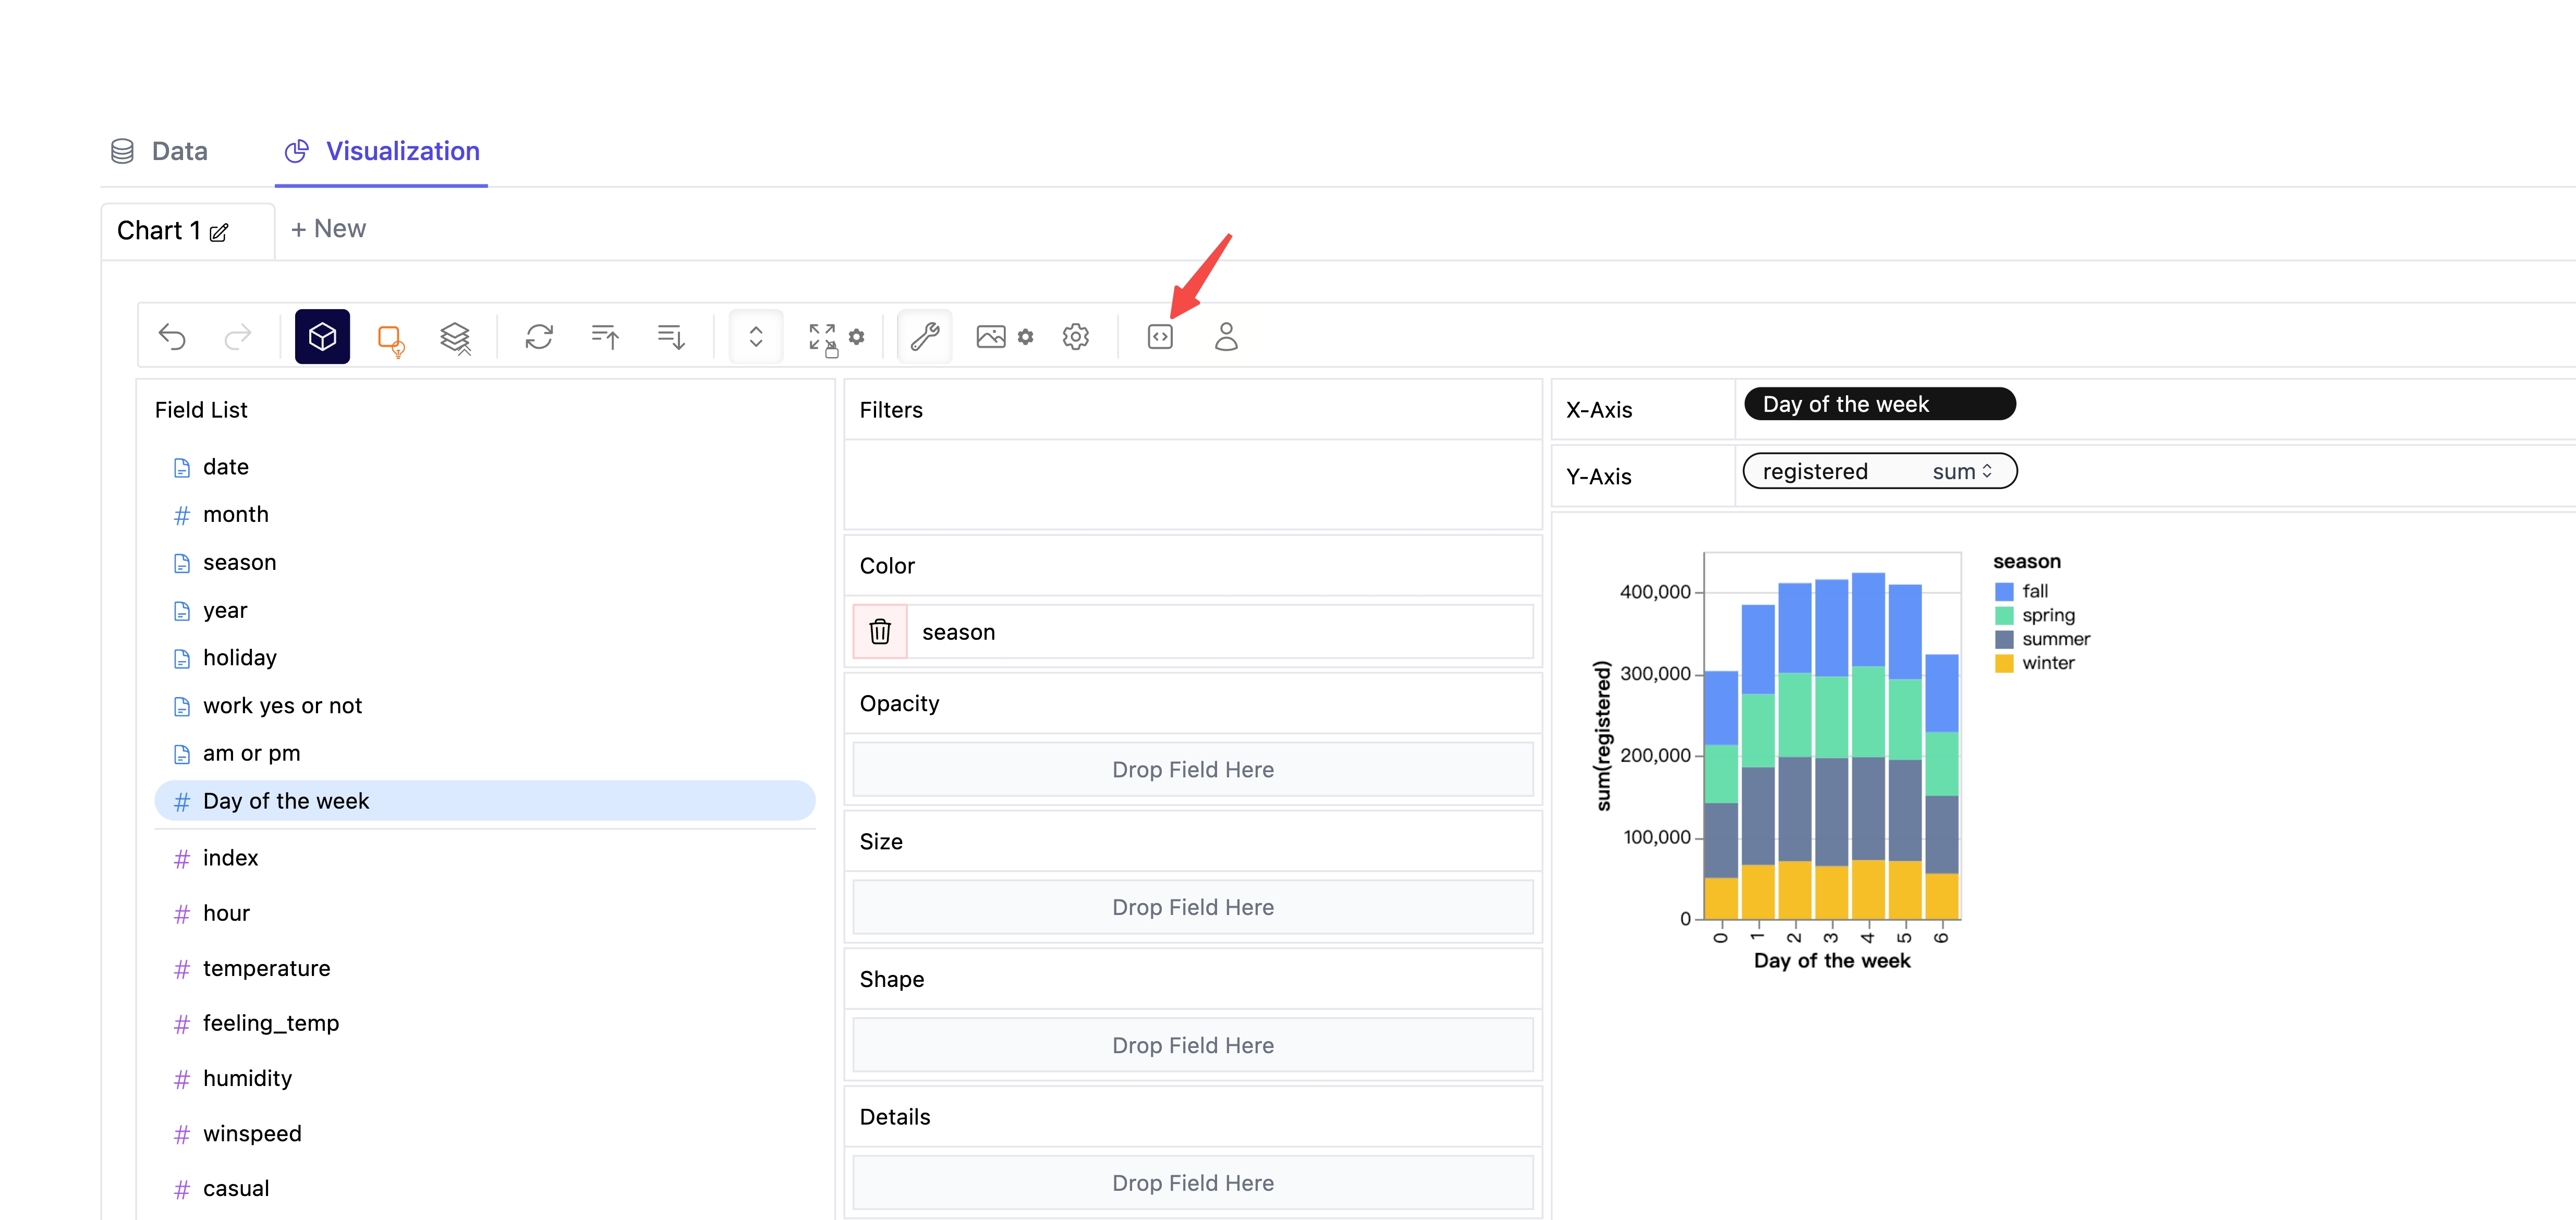
- Click the copy code button.
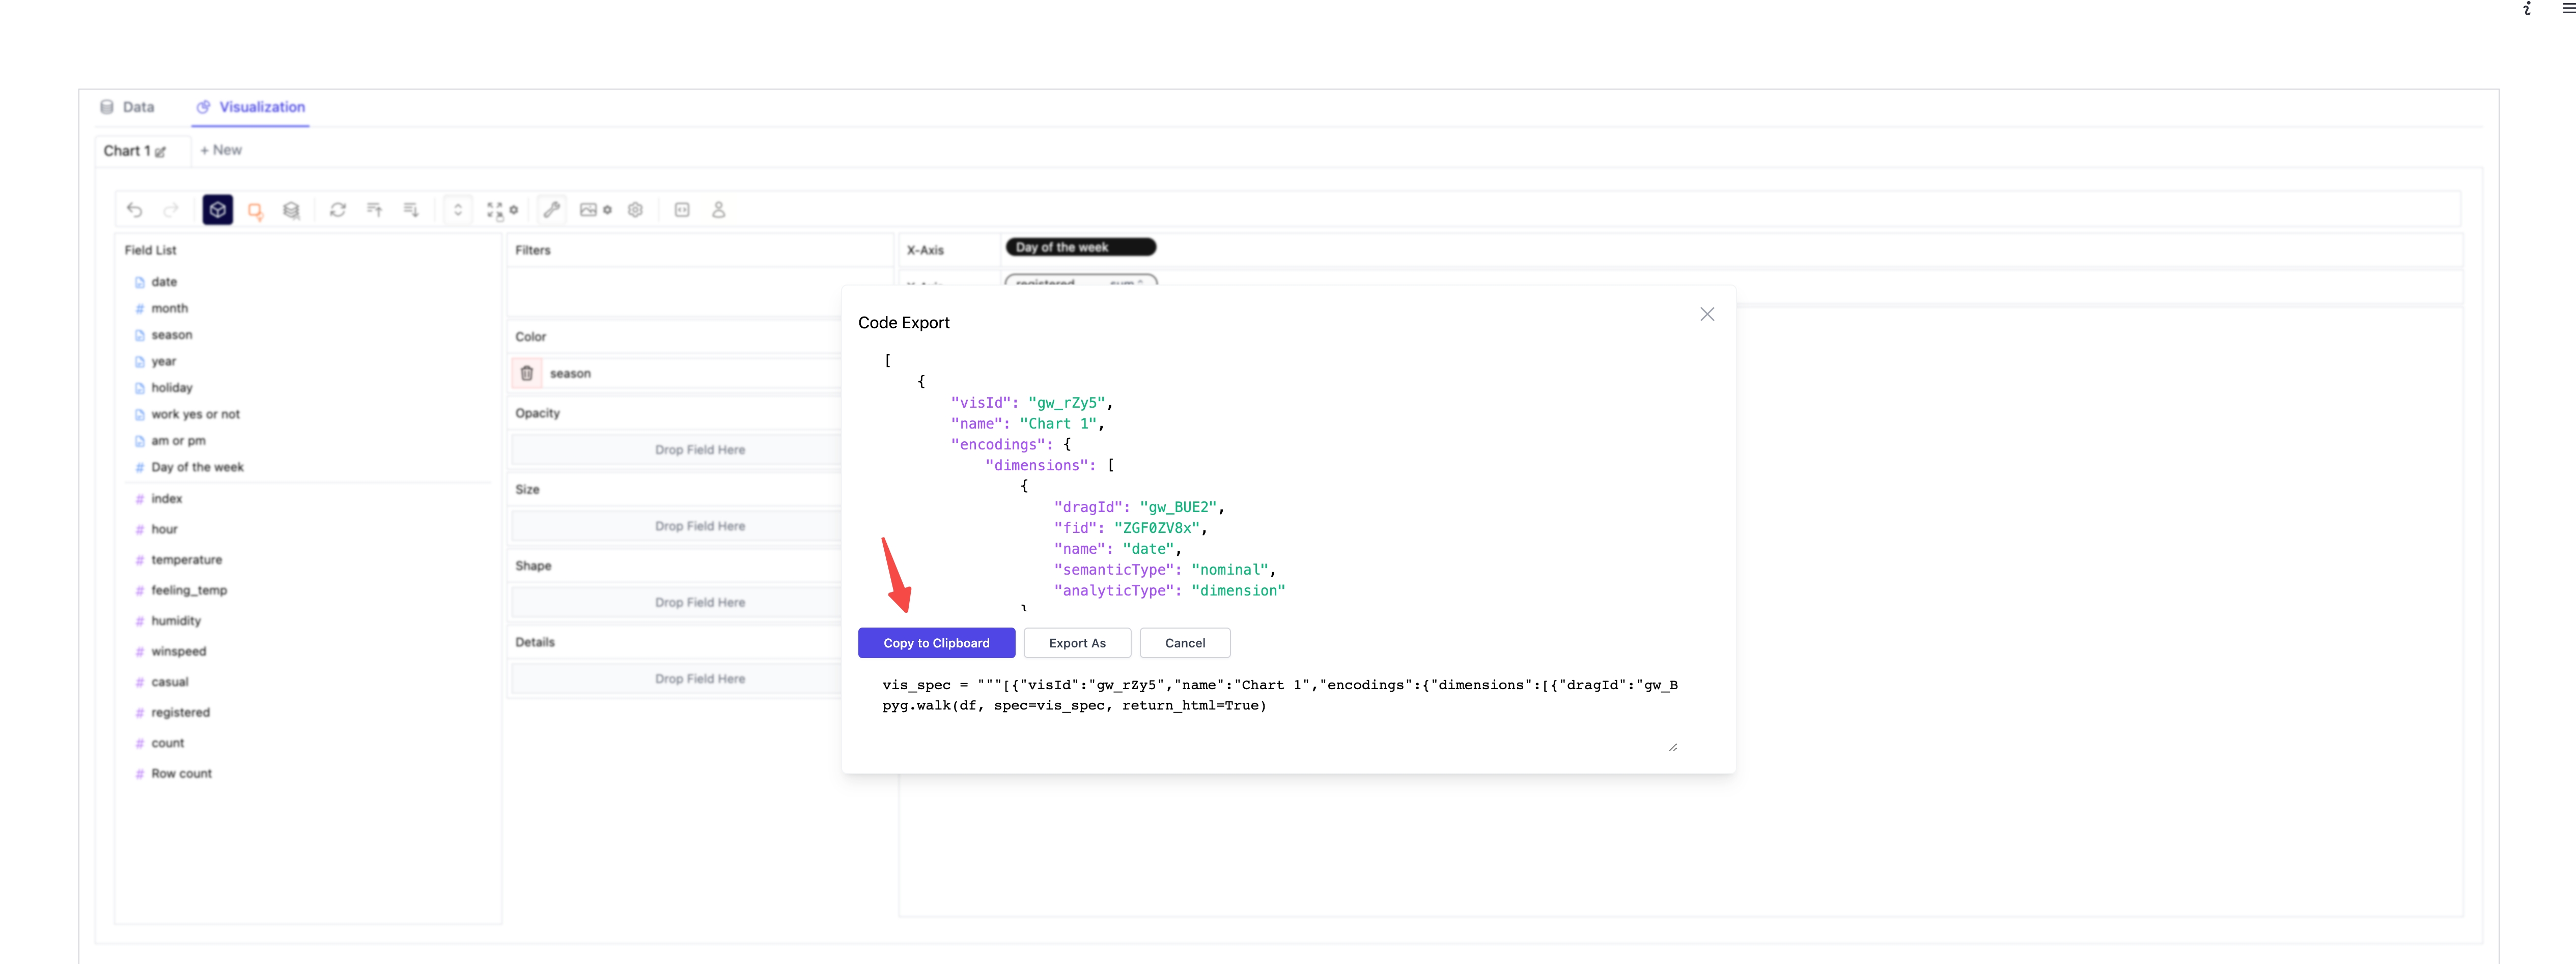
- Paste the copied code into your Python script, just where you need it.
import pygwalker as pyg
import pandas as pd
import streamlit.components.v1 as components
import streamlit as st

# Adjust the width of the Streamlit page
st.set_page_config(
    page_title="Use Pygwalker In Streamlit",
    layout="wide"
)

# Add Title
st.title("Use Pygwalker In Streamlit")

# Import your data
df = pd.read_csv("https://kanaries-app.s3.ap-northeast-1.amazonaws.com/public-datasets/bike_sharing_dc.csv")

# Paste the copied Pygwalker chart code here
vis_spec = """<PASTE_COPIED_CODE_HERE>"""

# Generate the HTML using Pygwalker
pyg_html = pyg.walk(df, spec=vis_spec, return_html=True)

# Embed the HTML into the Streamlit app
components.html(pyg_html, height=1000, scrolling=True)- Reload the web page to see the saved state of your Pygwalker chart.

Want to Learn how to create these awesome Data Visualizations within PyGWalker? Check out the Documentation for more detailed steps.
Part 4. Deploying Your Firebase Streamlit App
Firebase Streamlit Deployment: Taking Your App Live
Once you've built your Firebase Streamlit app, it's time to take it live. Firebase provides a hosting service that lets you deploy your app quickly and easily. With just a few commands, you can deploy your app to a production-ready environment with a custom domain, HTTPS, and a global CDN.
Streamlit, meanwhile, provides Streamlit Sharing, a platform for deploying, managing, and sharing your Streamlit apps. With Streamlit Sharing, you can deploy your app with a single click, manage your app's resources, and share your app with the world.
Firebase Streamlit Hosting: Where to Host Your App
When it comes to hosting your Firebase Streamlit app, you have several options. Firebase Hosting provides a fast, secure, and reliable way to host your app. With Firebase Hosting, you can serve your app from a global CDN, secure your app with SSL, and even host your app at a custom domain.
Alternatively, you might choose to host your app on a platform like Streamlit Sharing, Heroku, or Google Cloud. These platforms provide additional features like automatic
Here's the continuation of the article:
Part 5: Integrating Firestore with Streamlit
Firestore: A Flexible, Scalable Database
Firestore is a flexible, scalable database for mobile, web, and server development. It's a NoSQL database, which means you don't have to design a fixed schema for how your data will be structured before you begin. This flexibility makes Firestore great for quick prototyping. Firestore is hosted on the cloud, so you don't have to worry about maintaining your own servers. You can focus on building your app, and Firestore will handle the rest.
from google.cloud import firestore

# Add a new user to the database
db = firestore.Client()
doc_ref = db.collection('users').document('alovelace')
doc_ref.set({
 'first': 'Ada',
 'last': 'Lovelace',
 'born': 1815
})

# Then query to list all users
users_ref = db.collection('users')
for doc in users_ref.stream():
 print('{} => {}'.format(doc.id, doc.to_dict()))
Setting Up Firestore with Streamlit
To integrate Firestore with your Streamlit app, you'll first need to set up a Firebase account and create a Firestore database. Once your database is set up, you can start putting data into it. Firestore organizes data into collections and documents. A document is a grouping of key-value pairs, and a collection is a set of documents.
To connect your Streamlit app to Firestore, you'll need to download a service account key. This key is like a password that your Python code uses to log in to Firestore. Once you have this key, you can use Firestore's Python library to interact with your database.
import streamlit as st
from google.cloud import firestore

# Authenticate to Firestore with the JSON account key.
db = firestore.Client.from_service_account_json("firestore-key.json")

# Create a reference to the Google post.
doc_ref = db.collection("posts").document("Google")

# Then get the data at that reference.
doc = doc_ref.get()

# Let's see what we got!
st.write("The id is: ", doc.id)
st.write("The contents are: ", doc.to_dict())
Part 6: Building a Reddit Clone with Firebase and Streamlit
Creating a web application like Reddit from scratch may seem like a daunting task, but with Firebase and Streamlit, it's more accessible than you might think. Here's a step-by-step guide on how to create a Reddit clone using these tools:
Creating a Reddit Clone from Scratch
-
Design the Application: Before you start coding, it's essential to have a clear idea of what you want your application to look like and how it should function. For a Reddit clone, you'll need features like user authentication, post creation, and upvoting.
-
Set Up Firebase: Firebase will handle the backend of your application. You'll need to set up a Firebase project and enable the features you plan to use, such as Firebase Authentication and Firestore.
-
Set Up Streamlit: Streamlit will handle the frontend of your application. You'll need to install Streamlit and create a new Python script for your application.
-
Build the Application: With Firebase and Streamlit set up, you can start building your application. This will involve writing Python code to interact with Firebase and create your Streamlit interface.
Setting Up Your Git Repo
To keep track of your code and collaborate with others, you should store your code in a Git repository. Here's how to set up a new repo on GitHub:
-
Create a New Repository: Go to GitHub and create a new repository. Give it a name, add a description, and choose whether to make it public or private.
-
Clone the Repository: Once your repository is created, you can clone it onto your own computer. This will create a local copy of the repository where you can add, edit, and delete files.
-
Commit Changes: As you work on your project, you should regularly commit your changes. This saves a snapshot of your code at that point in time.
-
Push Changes: When you're ready to share your changes with others, you can push your commits to GitHub. This updates the online version of your repository with your local changes.
Running Streamlit on Your Own Computer
To run Streamlit on your own computer, you'll need to install it and create a new Python script. Here's how:
- Install Streamlit: You can install Streamlit using pip, a package installer for Python. Open your terminal and run the following command:
pip install streamlit-
Create a New Python Script: Once Streamlit is installed, you can create a new Python script for your application. This script will contain your Streamlit code.
-
Run Your Streamlit App: To run your Streamlit app, navigate to the directory containing your Python script and run the following command:
streamlit run your_script.pyReplace your_script.py with the name of your Python script. This will start your Streamlit app and open it in your web browser.
Deploying Your App on Streamlit Sharing
Streamlit Sharing is a platform that allows you to deploy, manage, and share your Streamlit apps. Here's how to deploy your app on Streamlit Sharing:
-
Commit Your Changes: Before you can deploy your app, you need to commit any changes you've made. This saves a snapshot of your code at that point in time.
-
Push Your Changes: Once your changes are committed, you can push them to GitHub. This updates the online version of your repository with your local changes.
-
Create a New App on Streamlit Sharing: Go to Streamlit Sharing and create a new app. You'll need to give it a name, select your GitHub repository, and choose the branch
Part 7: Setting Up Firestore
Firestore is a NoSQL document database that lets you easily store, sync, and query data for your mobile and web apps at a global scale. It's a part of the Firebase platform, which is a collection of cloud-based tools for building and managing apps. Here's how to set up Firestore for your Streamlit app:
Setting Up a Firebase Account
-
Go to the Firebase website: Visit the Firebase website (opens in a new tab) and click on "Get started."
-
Sign in with your Google account: Firebase is a Google product, so you'll need a Google account to use it. If you don't have one, you can create one for free.
-
Create a new Firebase project: Once you're signed in, you can create a new Firebase project. Give your project a name, accept the terms and conditions, and click on "Create project."
Creating a Firestore Database
-
Go to the Firestore section: In your Firebase project, go to the Firestore section. This is where you'll create your Firestore database.
-
Create a new Firestore database: Click on "Create database" to create a new Firestore database. Choose "Start in production mode" to secure your database with Firestore's default security rules.
-
Choose a location for your database: Firestore will ask you to choose a location for your database. This is the location of the servers where your data will be stored. Choose a location that's close to your users to ensure fast load times.
Downloading Your Account Keys
-
Go to the Firebase console: In your Firebase project, go to the Firebase console. This is where you'll download your account keys.
-
Go to the Service Accounts tab: In the Firebase console, go to the Service Accounts tab. This is where you'll create a new service account and download your account keys.
-
Create a new service account: Click on "Create new service account" to create a new service account. Give your service account a name and a description, and click on "Create."
-
Download your account keys: Once your service account is created, you can download your account keys. Click on "Generate new private key" to download your account keys. This will download a JSON file containing your account keys.
-
Use your account keys in your Streamlit app: In your Streamlit app, you can use your account keys to authenticate with Firestore. Here's an example of how to do this:
from google.cloud import firestore

# Use the service account key to authenticate with Firestore
db = firestore.Client.from_service_account_json("path/to/your/serviceAccountKey.json")

# Now you can use `db` to interact with your Firestore database
Replace "path/to/your/serviceAccountKey.json" with the path to the JSON file you downloaded. Now you can use the db object to interact with your Firestore database.
Part 8: Deploying Streamlit App on Firebase
Firebase is a popular choice for deploying web applications due to its ease of use and robust features. However, deploying a Streamlit app on Firebase requires a different approach as Firebase Hosting primarily serves static content. Here's a step-by-step guide on how to deploy your Streamlit app:
-
Prepare Your App for Deployment: Before deploying your app, make sure it's ready for production. This might involve testing, debugging, and finalizing your app's features.
-
Build Your App: Streamlit apps need to be built into a static site before they can be deployed on Firebase. You can use tools like PyInstaller or Docker to build your app.
-
Create a Firebase Project: If you haven't already, create a new Firebase project in the Firebase console.
-
Install Firebase CLI: The Firebase CLI (Command Line Interface) is a tool that lets you manage your Firebase projects from the command line. Install it using npm (Node Package Manager) with the command
npm install -g firebase-tools. -
Initialize Your Firebase Project: In your project's directory, run the command
firebase initto initialize your Firebase project. -
Deploy Your App: Finally, you can deploy your app using the command
firebase deploy. This will upload your app to Firebase Hosting and give you a URL where you can access your app.
Please note that Streamlit apps are interactive and dynamic, which doesn't fit well with Firebase Hosting's focus on static content. As a result, you might run into some limitations when deploying your Streamlit app on Firebase. For more complex Streamlit apps, consider using other deployment options like Heroku, AWS EC2, or even Streamlit's own sharing platform.
Part 9: Conclusion
In this article, we've explored how to use Firebase with Streamlit to build a serverless web app in Python. We've covered the basics of Firebase and Streamlit, how to integrate Firestore with Streamlit, and how to build and deploy a Reddit clone using these tools.
Whether you're a seasoned developer or just starting out, Firebase and Streamlit offer a powerful combination for building web apps. With Firebase handling the backend and Streamlit taking care of the frontend, you can focus on what matters most: creating an amazing app for your users.
Have you heard of this awesome Data Analysis & Data Visualisation tool, that turns your Streamlit App into Tableau?
PyGWalker is a Python Library that helps you easily embed a Tableau-like UI into your own Streamlit app effortlessly.

Frequently Asked Questions
How do I connect Firebase to Streamlit?
To connect Firebase to Streamlit, you'll need to use the Firebase SDK for Python. You'll also need to download a service account key from your Firebase project, which your Python code will use to authenticate with Firebase.
What are the disadvantages of Streamlit?
While Streamlit is a powerful tool for building data apps, it does have some limitations. For example, Streamlit apps are not truly multi-user and don't support user authentication out of the box. Also, because Streamlit is relatively new, it doesn't have as large a community or as many resources as older frameworks like Flask or Django.
How to connect Streamlit to a database?
To connect Streamlit to a database, you'll need to use a Python library that can interact with your type of database. For example, if you're using a SQL database, you might use a library like SQLAlchemy. If you're using Firestore, you can use the Firestore library for Python. Once you've established a connection to your database, you can use SQL commands (for SQL databases) or Firestore methods (for Firestore) to interact with your data.